In our new cabinet, we have about 3 large glass shelves, each 90 cm x 90 cm. The idea came to mind to put some “big” locomotives on these shelves. So, I started looking around, and noticed that “gauge 1” or “LGB” or “G-scale” locomotives where in fact “to expensive” to just use is as “decoration”. Why buy a complete engine with all electronics in it and a motor, if you are only going to use it as a static model ?
So, I looked a bit further, and I found some interesting kits in scale 1/35th, from Trumpeter. One of these kits is a BR52, which, once finished, will measure about 89 cm in length. If I put this locomotive diagonally on the shelve, I will even have about 30 centimeters left 🙂 After a while, the idea became even “bigger”: Why only put a locomotive on rails in the cabinet ? Why not create a complete diorama around it ? Due to a mistake of an Ebay seller, and just plain luck, I became the (proud) owner of a WR360 C12 kit from Trumpeter, also in scale 1/35th ! So, we still have no “real” idea how this diorama is going to look like (in contrary with the BR52)

The original trumpeter kit.
First experience in this “large scale” for me (Friday – october, 16th – 2009)
The first pieces glued together, I really like the details of this scale.

Another view, the pieces do fit nicely tight together.

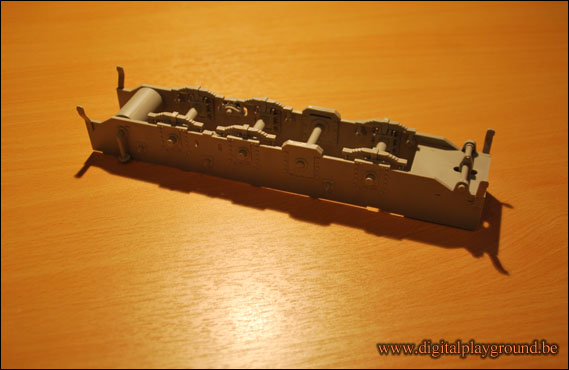
A closeup of the underside of the locomotive.

the wheels painted red. This is done with an airbrush. I never used an airbrush before in my life, after “strugling/experimenting” with it for 15 minutes, I decided to give it a try. The result turned out very nice 🙂

After letting the wheels dry overnight, I decided to do a “dry-fit”. (e.g. they still can be taken off)

A closeup of the wheels connected to the body.
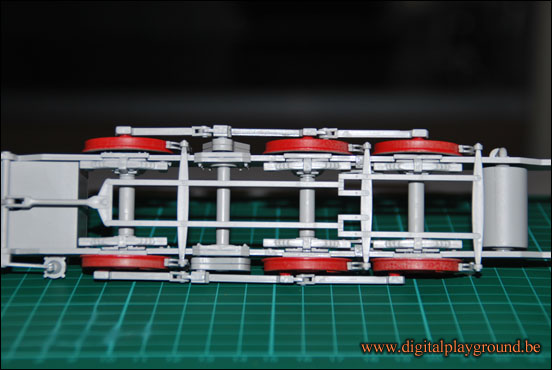
Bottom-view of the locomotive.

The “motor-housing” also completed, but not yet glued to the bottomplate. The white spots on the picture, is actually “Tamiya Putty”, to cover-up some damages on the parts. Next step will be to take the wheels and motor-housing off, and paint the unter-body red. After this I can start painting the buffers and coupling, and put them on. The wheels still need a touch of “blank metal” paint 🙂
Some paintjobs and first steps in weathering (Monday – october, 19th – 2009)

The underbody, completely painted red. The wheels still need some shiny varnish !

Front-view. Those “white”-pieces on the black paint, is actually some bright light shining on it.
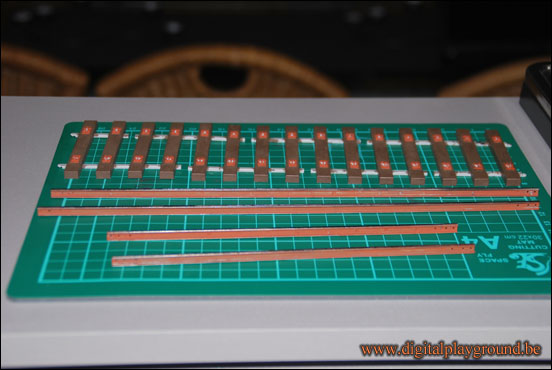
I already started with the rails 🙂

First, I painted the rails with “oily steel”, next I added a wetwash of “rust”-paint.

The top of the rails is rubbed in with “graphite powder”, to make them look like shiny blanc steel. (The photo doesn’t do justice to the final result)
*Almost* finished (Thursday – october, 22th – 2009)

Frontview, I still need to add some SMD LEDs into the headlights.

Sideview, upper part is painted in “somber gray”.
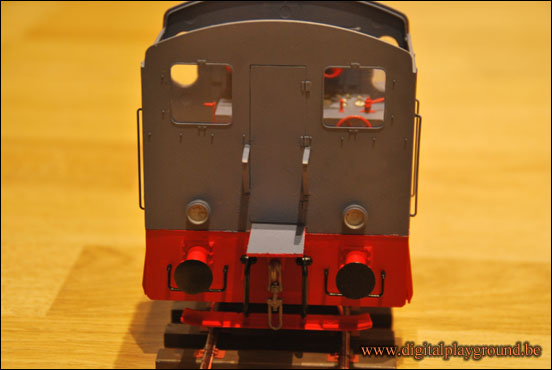
Backview …

Inside view of the cabine. I even made some needle-gauges ! (I painted it with a real needle, lol)

This set does not come with decals, so I ordered them separately.

Aah, my tracks. It’s starting to looking good … (still some work tough)
Next, I will add some SMD LEDs for head- & tail-lights (and also an SMD LED into the drivers cabine) After that, I will surely add the decals. Also, With 3 full pigment sets of vallejo (each set containing 4 different pigments), I will make the locomotive look “more realistic” (e.g. “dirty”)
Lights installed and weathering almost done (Monday – october, 26th – 2009)
Next, I started adding lights (SMS LEDs) into the front- & backlights, and also in the driver-cabine. Those SMD LEDs are only 2 millimeters width ! (0.078 inch) I still need to add a driver inside the cabine, so the roof is not yet “fixed” on the loc ! Also, I’m still waiting for some clear (look-trough) red, yellow and orange paint to arrive, to put on the white SMD LEDs, So don’t mind the “white lights” at the moment.

The little yellow “thingy” is the SMD LED, for comparison, a green square is only 1 cm x 1 cm (0.39 inch x 0.39 inch) I need to solder a wire at both sides of these LEDs 🙂

On the left, the SMD LED is installed, on the right you see how I did put the wires trough the headlights.

Frontlights and cabine light illuminated ! (I ordered some red, yellow & orange “clear” paint to put on the tail-, front- & cabine LEDs)

Backlights and cabine light illuminated ! (Also here, I’m still waiting for the clear paint to arrive)

Backview, you have a nice clear view inside the cabine.

Closeup of the inside of the cabine. (picture taken with the cabine-roof removed)

Even with a sideview, you can see the interior of the driver-cabine.
The initial weathering is also done. I’m happy with the results on the cabine & engine-block itself, but the “chassis” still needs to be a bit “darkened”. Bear in mind that this is my first weathering ever ! (I used Vallejo pigments for it) (the following pictures are taken with the SMD LEDs “off”, so they don’t “interrupt” the view)

The same sideview as the previous picture, but with the lights out 🙂

The other side.

Front view.

Back view.

View from above, I really like the “rusted” look.

Detail 1: upper part looks good, but lower part needs a bit more of an “oil & greace” look.

Detail 2: Even the nummer of the locomotive is “worn out” 🙂

Detail 3: Dirt and rust all around …(the wooden parts of the rails still needs to be weathered correctly)