I have a “magic mirror” in our bath-room, to watch news/videos/house overview.
When the screen is on, it “shines” trough this mirror, making the screen visible.
When turned off, the mirror is just a regular mirror.
This is done with a “one-way” mirror foil onto a glass plate.
In a bathroom it’s not a good idea to use touch-screen, so I did go with a gesture sensor, PAJ7620 and connected it to an ESP32.
This sensor detects:
– wave
– move left / right / up / down
– move closer / further
– clockwise / anticlockwise circles
Communication between the ESP32 and HA, is done via MQTT.
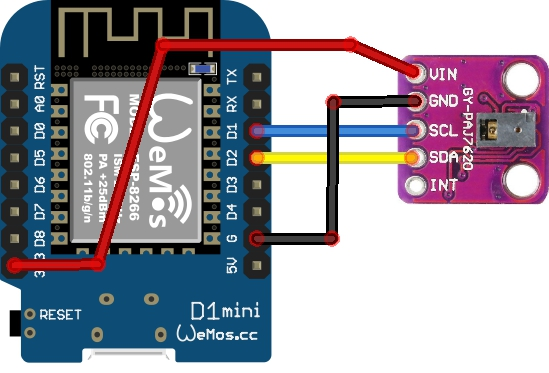
1. Connect the PAJ7620 to the ESP32
Follow the schematic, to connect the PAJ7620 to the ESP32.
2. Flash code to ESP32
*Make sure you have the Arduino IDE installed (I use version 1.8.19)
*Make sure you have the ESP32 board installed
*install the following libraries: PubSubClient and RevEng_PAJ7620
*(Have a look this guide https://docs.arduino.cc/software/ide-v1/tutorials/installing-libraries )
*Use the following code:
#include <WiFi.h>
#include <PubSubClient.h>
#include "RevEng_PAJ7620.h"


//---WiFi----------------------------------------------------------------------
const char *ssid = "YOUR_SSID";
const char *password = "YOUR_PASSWORD";
WiFiClient espClient;

//---MQTT Broker-------------------------------------------------------------
const char *mqtt_broker = "YOUR_MQTT_BROKER";
const char *topic = "ESP32/PAJ7620";
const char *mqtt_username = "YOUR_MQTT_USER";
const char *mqtt_password = "YOUR_MQTT_PASSWORD";
const int mqtt_port = 1883;
PubSubClient client(espClient);
int IntSwitch = 0;

RevEng_PAJ7620 sensor = RevEng_PAJ7620();

//---Setup-------------------------------------------------------------------
void setup()
{
  //---setup WiFi---
  Serial.begin(115200);

  if( !sensor.begin() )
  {
    Serial.print("PAJ7620 I2C error !");
    while(true) { }
  }

  WiFi.begin(ssid, password);
  Serial.print("Connection to WiFi ...");
  while (WiFi.status() != WL_CONNECTED)
  {
    delay(100);
    Serial.print(".");
  }
  Serial.println("");
  Serial.println("Connected to the WiFi network");
  client.setServer(mqtt_broker, mqtt_port);
  client.setCallback(callback);

  while (!client.connected())
  {
    String client_id = "esp32-";
    client_id += String(WiFi.macAddress());
    Serial.printf("The client %s connects to the public mqtt broker\n", client_id.c_str());
    if (client.connect(client_id.c_str(), mqtt_username, mqtt_password))
    {
      Serial.println("HA mqtt broker connected");
    }
    else
    {
      Serial.print("failed with state ");
      Serial.print(client.state());
      delay(2000);
    }
  }
}

//---callback------------------------------------------------------------------
void callback(char* topic, byte* payload, unsigned int length)
{
  Serial.print("Message arrived [");
  Serial.print(topic);
  Serial.print("] ");
  for (int i=0;i<length;i++)
  {
    Serial.print((char)payload[i]);
  }
  Serial.println();
}

//---Main loop---------------------------------------------------------------
void loop()
{
  String StrState = "";
  //---read sensor, publish and subscribe---
  Gesture gesture;
  gesture = sensor.readGesture();

  switch (gesture)
  {
    case GES_FORWARD:
      {
        StrState = "FORWARD";
        break;
      }

    case GES_BACKWARD:
      {
        StrState = "BACKWARD";
        break;
      }

    case GES_LEFT:
      {
        StrState = "LEFT";
        break;
      }

    case GES_RIGHT:
      {
         StrState = "RIGHT";
       break;
      }

    case GES_UP:
      {
         StrState = "UP";
       break;
      }

    case GES_DOWN:
      {
        StrState = "DOWN";
        break;
      }

    case GES_CLOCKWISE:
      {
        StrState = "CLOCKWISE";
        break;
      }

    case GES_ANTICLOCKWISE:
      {
        StrState = "ANTICLOCKWISE";
        break;
      }

    case GES_WAVE:
      {
        StrState = "WAVE";
        break;
      }

    case GES_NONE:
      {
        StrState = "NONE";
        break;
      }
  }

  if( gesture != GES_NONE )
  {
    //Serial.print(", Code: ");
    //Serial.println(gesture);
    IntSwitch = 1 - IntSwitch;
    StrState = StrState + "|" + String(IntSwitch);
    char ChrState[StrState.length()+1];
    StrState.toCharArray(ChrState,StrState.length()+1);
    Serial.print(topic);
    Serial.print("=");
    Serial.println(ChrState);
    client.publish(topic, ChrState,true);
    client.subscribe(topic);
  }
  delay(100);
  client.loop();
}
*Replace YOUR_SSID with the SSID of your own WiFi
*Replace YOUR_PASSWORD with your own WiFi password
*Replace YOUR_MQTT_BROKER with the IP address of your MQTT broker (typically, the same IP as your HA instance)
*Replace YOUR_MQTT_USER with the default username to connect to your MQTT.
*Replace YOUR_MQTT_PASSWORD with the password for this MQTT username.
*Compile this code, and write it to your ESP32.
If everything goes well, you will see a new topic “ESP32/PAJ7620” on your MQTT broker.
When you are not familiar with MQTT viewing, download the free MQTT explorer from http://mqtt-explorer.com/
It’s available for Windows / MacOS / Ubuntu / other Linux versions. There is even a video on this website, with an explanation on how to use this nice tool from Thomas Nordquist.
When you make a move in front of the sensor, you will see one of the following descriptions in the MQTT topic:
UP|0
UP|1
DOWN|0
DOWN|1
LEFT|0
LEFT|1
RIGHT|0
RIGHT|1
FORWARD|0
FORWARD|1
BACKWARD|0
BACKWARD|1
CLOCKWISE|0
CLOCKWISE|1
ANTICLOCKWISE|0
ANTICLOCKWISE|1
WAVE|0
WAVE|1
As you may notice, every gesture can have 2 different MQTT descriptions.
One ending on |0 and one ending op |1
This is to make a difference, of you want to trigger multiples of the same events.
Every gesture will trigger an alternating event, with an identical name, but a 0 or 1 after the pipe sign.
2. Getting the MQTT data into HA (as a sensor)
Next, you need to add a little part to your configuration.yaml , to get the MQTT data in HA as a sensor value. So, add the following code and reboot HA.
After rebooting, you will have a sensor ESP_MQTT_PAJ7620 , whenever you make a gesture in front of the PAJ7620, you should immediately see it reflected in this sensor-value in HA.
mqtt:
  sensor:
    - name: "ESP32_MQTT_PAJ7620"
      state_topic: "ESP32/PAJ7620"
      value_template: "{{ value }}"
      qos: 1
3. Do something “usefull” with this sensor
I will explain a bit, on how I use this sensor.
I divided this automation in 2 pieces, to make it a bit more clear.
Part 1:
alias: "@Automation - ESP32/PAJ7620 - Left/Right/Up/Down/clockwise/anticlockwise"
description: ""
trigger:
  - platform: mqtt
    topic: ESP32/PAJ7620
    payload: LEFT|1
    id: Move_Left
    alias: LEFT|1
  - platform: mqtt
    topic: ESP32/PAJ7620
    payload: LEFT|0
    id: Move_Left
    alias: LEFT|0
  - platform: mqtt
    topic: ESP32/PAJ7620
    payload: RIGHT|1
    id: Move_Right
    alias: RIGHT|1
  - platform: mqtt
    topic: ESP32/PAJ7620
    payload: RIGHT|0
    id: Move_Right
    alias: RIGHT|0
  - platform: mqtt
    topic: ESP32/PAJ7620
    payload: UP|0
    id: Move_Up
    alias: UP|0
  - platform: mqtt
    topic: ESP32/PAJ7620
    payload: UP|1
    id: Move_Up
    alias: UP|1
  - platform: mqtt
    topic: ESP32/PAJ7620
    payload: DOWN|0
    id: Move_Down
    alias: DOWN|0
  - platform: mqtt
    topic: ESP32/PAJ7620
    payload: DOWN|1
    id: Move_Down
    alias: DOWN|1
  - platform: mqtt
    topic: ESP32/PAJ7620
    payload: CLOCKWISE|0
    id: Move_clockwise
    alias: CLOCKWISE|0
  - platform: mqtt
    topic: ESP32/PAJ7620
    payload: CLOCKWISE|1
    id: Move_clockwise
    alias: CLOCKWISE|1
  - platform: mqtt
    topic: ESP32/PAJ7620
    payload: ANTICLOCKWISE|0
    id: Move_anticlockwise
    alias: ANTICLOCKWISE|0
  - platform: mqtt
    topic: ESP32/PAJ7620
    payload: ANTICLOCKWISE|1
    id: Move_anticlockwise
    alias: ANTICLOCKWISE|1
The first part of this automation is very easy 🙂
I created a trigger for the up / down / left /right / (anti)clockwise movements.
(I don’t use Forward / Backward events, but you can use them if you want. They are in essence trigger
when you move your hand closer/further away to/from the sensor.
I created a double trigger for every gesture, one ending on |0 and one ending on |1
I point every double trigger, to the same Trigger-ID, so I only have to “write” one action for every gesture.
Before moving on with part 2 of this automation, let me first show you 3 screenshots.
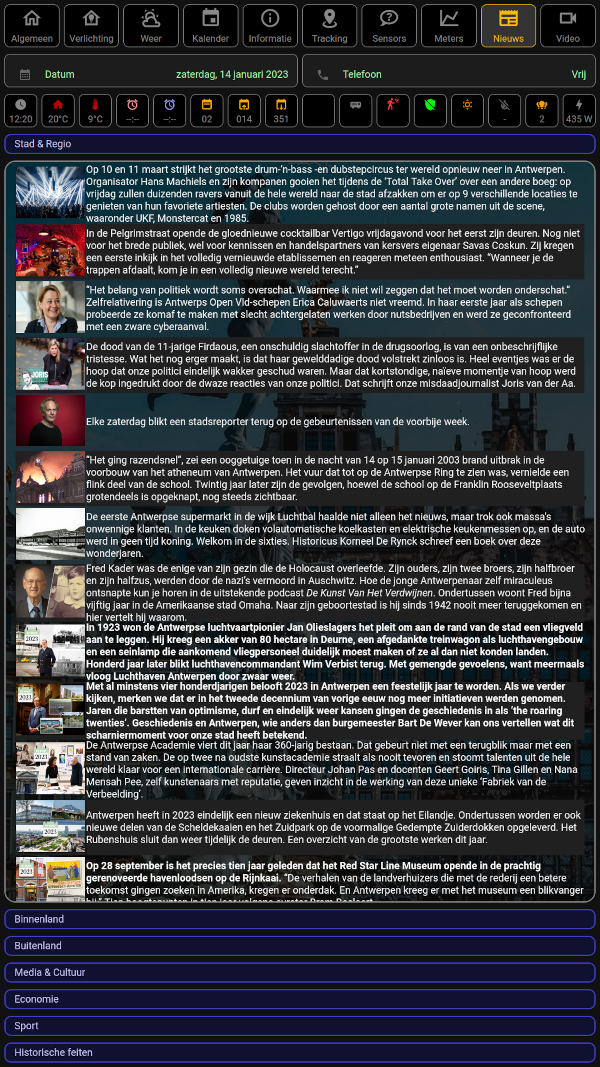
This is how the bathroom screen looks like, with the 9th dashboard active.
a 1920×1080 screen, in portrait mode.
On top is a menu with 10 icons, to switch between different dashboards.
You simply make a gesture to the right or left, to switch between the previous or next dashboard.
(When at the beginning, trying to swipe to the left, brings you to the last dashboard –
this also works in opposite direction, when at the end of the menu …)
When you are at the News dashboard, making an up or down gesture, the news-page switches to the next
or previous category of news-items.
(In this screenshot, we are at the first category, and there are 6 categories below it)
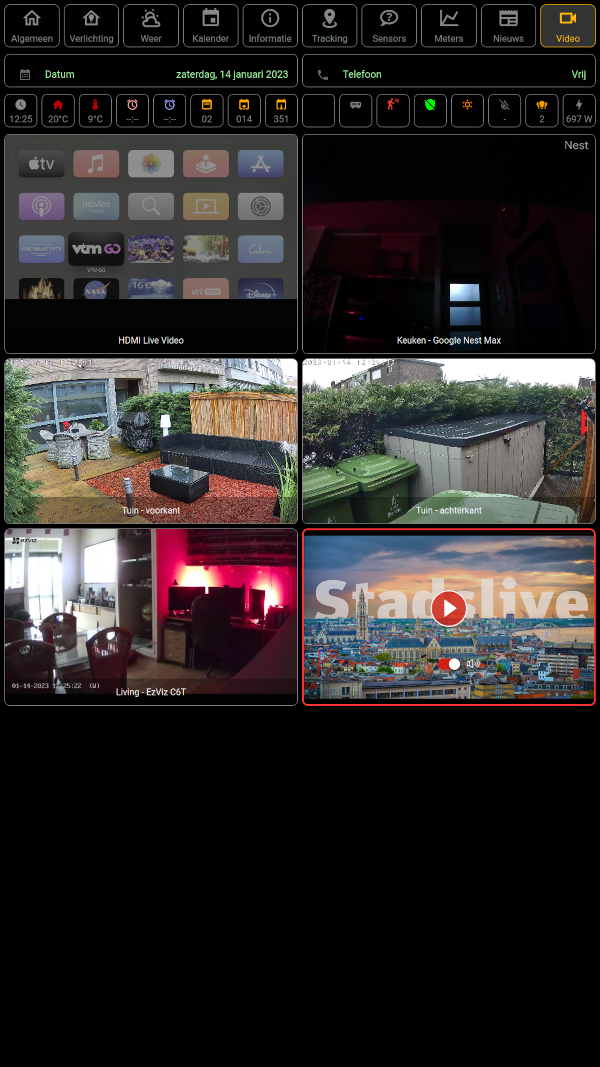
When moving to the Video dashboard, you will see 6 live video streams. (more will be added later)
Making an up or down gesture, gives you the ability to select a video stream.
(It will be marked with a red box around it)
When you make a clockwise gesture (with one finger, just like Harry Potter does his magic),
the video will be put fullscreen (taking the aspect ratio into account).
Making an anti-clockwise gesture, will disable the fullscreen video, switching back to the view as in the above picture.
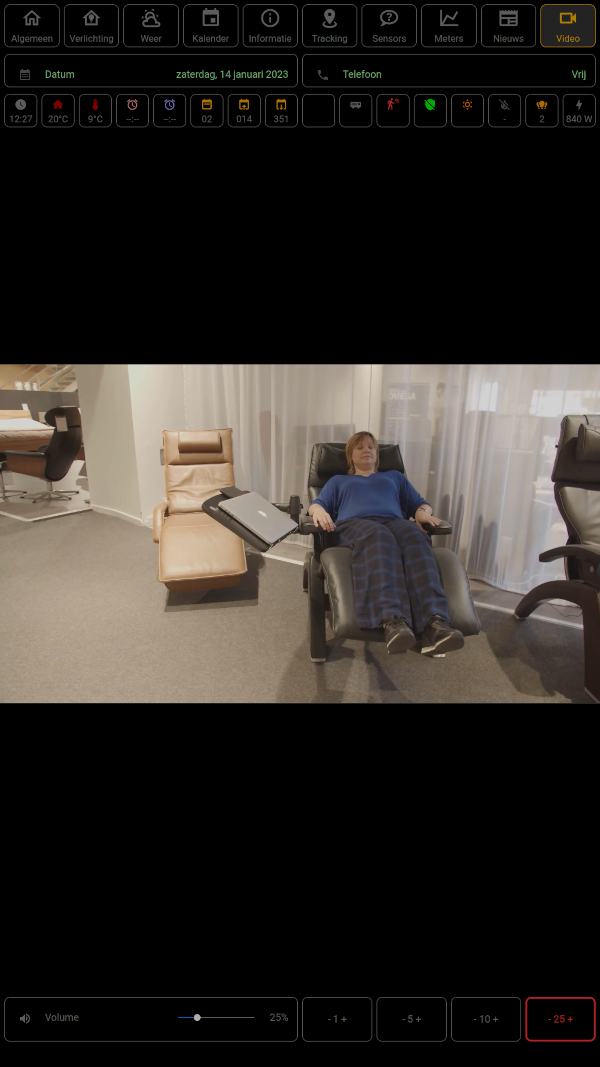
When a video is playing in fullscreen mode (camera view, or live TV stream, or regional news),
you get other functionality from the up/down/left/right gestures, as long as the fullscreen video is visible.
When gesturing up or down, you can turn the sound volume up or down.
Because you don’t want a gesture 50 times of you want to change the volume 50%, there are 4 buttons next to the volume overview: -1+ , -5+, -10+, -25+
You can switch the “step”, by making a left or right gesture. When you make an up or down gesture, the volume will change, with the selected step-size.
As you see, you can do much, without a touch-screen, if you think trough it 🙂
Part 2:
condition: []
action:
  - if:
      - condition: trigger
        id: Move_Left
      - condition: state
        entity_id: input_boolean.camera_fullscreen
        state: "off"
    then:
      - service: counter.decrement
        data: {}
        target:
          entity_id: counter.pagina
    alias: Left (Previous dashboard)
  - if:
      - condition: trigger
        id: Move_Right
      - condition: state
        entity_id: input_boolean.camera_fullscreen
        state: "off"
    then:
      - service: counter.increment
        data: {}
        target:
          entity_id: counter.pagina
    alias: Right (next dashboard)
  - if:
      - condition: trigger
        id: Move_Up
      - condition: state
        entity_id: counter.pagina
        state: "9"
      - condition: state
        entity_id: input_boolean.camera_fullscreen
        state: "off"
    then:
      - service: counter.decrement
        data: {}
        target:
          entity_id: counter.news
    alias: UP - News dashboard (9)
  - if:
      - condition: trigger
        id: Move_Down
      - condition: state
        entity_id: counter.pagina
        state: "9"
      - condition: state
        entity_id: input_boolean.camera_fullscreen
        state: "off"
    then:
      - service: counter.increment
        data: {}
        target:
          entity_id: counter.news
    alias: DOWN - News dashboard (9)
  - if:
      - condition: trigger
        id: Move_Up
      - condition: state
        entity_id: counter.pagina
        state: "10"
      - condition: state
        entity_id: input_boolean.camera_fullscreen
        state: "off"
    then:
      - service: counter.decrement
        data: {}
        target:
          entity_id: counter.camera
    alias: UP - Camera dashboard (10)
  - if:
      - condition: trigger
        id: Move_Down
      - condition: state
        entity_id: counter.pagina
        state: "10"
      - condition: state
        entity_id: input_boolean.camera_fullscreen
        state: "off"
    then:
      - service: counter.increment
        data: {}
        target:
          entity_id: counter.camera
    alias: DOWN - Camera dashboard (10)
  - if:
      - condition: trigger
        id: Move_clockwise
      - condition: state
        entity_id: counter.pagina
        state: "10"
      - condition: state
        entity_id: input_boolean.camera_fullscreen
        state: "off"
    then:
      - service: browser_mod.close_popup
        data: {}
        target:
          device_id: f702e60ab257c2e45308dc8b452e56a3
      - service: input_boolean.turn_on
        data: {}
        target:
          entity_id: input_boolean.camera_fullscreen
      - if:
          - condition: state
            entity_id: counter.camera
            state: "1"
        then:
          - service: browser_mod.more_info
            data:
              entity: camera.hdmi_live_video
              large: true
            target:
              device_id: f702e60ab257c2e45308dc8b452e56a3
          - delay:
              hours: 0
              minutes: 0
              seconds: 5
              milliseconds: 0
          - service: shell_command.portrait_make_camera_fullscreen
            data: {}
      - if:
          - condition: state
            entity_id: counter.camera
            state: "2"
        then:
          - service: browser_mod.more_info
            data:
              entity: camera.huiskamer
              large: true
            target:
              device_id: f702e60ab257c2e45308dc8b452e56a3
          - delay:
              hours: 0
              minutes: 0
              seconds: 5
              milliseconds: 0
          - service: shell_command.portrait_make_camera_fullscreen_googlenest
            data: {}
      - if:
          - condition: state
            entity_id: counter.camera
            state: "3"
        then:
          - service: browser_mod.more_info
            data:
              entity: camera.tapo_camera_tuin_voorkant_hd
              large: true
            target:
              device_id: f702e60ab257c2e45308dc8b452e56a3
          - delay:
              hours: 0
              minutes: 0
              seconds: 5
              milliseconds: 0
          - service: shell_command.portrait_make_camera_fullscreen
            data: {}
      - if:
          - condition: state
            entity_id: counter.camera
            state: "4"
        then:
          - service: browser_mod.more_info
            data:
              entity: camera.tapo_camera_tuin_voorkant_hd
              large: true
            target:
              device_id: f702e60ab257c2e45308dc8b452e56a3
          - delay:
              hours: 0
              minutes: 0
              seconds: 5
              milliseconds: 0
          - service: shell_command.portrait_make_camera_fullscreen
            data: {}
      - if:
          - condition: state
            entity_id: counter.camera
            state: "5"
        then:
          - service: browser_mod.more_info
            data:
              large: true
              entity: camera.c6t_c42781605
            target:
              device_id: f702e60ab257c2e45308dc8b452e56a3
          - delay:
              hours: 0
              minutes: 0
              seconds: 5
              milliseconds: 0
          - service: shell_command.portrait_make_camera_fullscreen
            data: {}
      - if:
          - condition: state
            entity_id: counter.camera
            state: "6"
        then:
          - service: browser_mod.popup
            data:
              type: custom:popup-card
              style: >-
                --popup-min-width: 1220px; --popup-max-width: 1220px;
                --popup-border-width: 420px; --popup-border-color: #000000;
                --popup-border-radius: 0px; --popup-background-color: #000000;
                --popup-padding-x: 0px; --popup-padding-y: 0px;
              content:
                type: iframe
                url: https://player.agnoplay.com/embed/gvaatv-live
            target:
              device_id: f702e60ab257c2e45308dc8b452e56a3
          - service: shell_command.portrait_click_middle_of_the_screen
            data: {}
    alias: CLOCKWISE - Camera dashboard (10) to fullscreen
  - if:
      - condition: trigger
        id: Move_anticlockwise
      - condition: state
        entity_id: counter.pagina
        state: "10"
      - condition: state
        entity_id: input_boolean.camera_fullscreen
        state: "on"
    then:
      - service: browser_mod.close_popup
        data: {}
        target:
          device_id: f702e60ab257c2e45308dc8b452e56a3
      - service: input_boolean.turn_off
        data: {}
        target:
          entity_id: input_boolean.camera_fullscreen
    alias: CLOCKWISE - Camera dashboard (10) close fullscreen
  - if:
      - condition: trigger
        id: Move_Left
      - condition: state
        entity_id: input_boolean.camera_fullscreen
        state: "on"
    then:
      - service: input_select.select_previous
        data: {}
        target:
          entity_id: input_select.camera_volume_step
    alias: LEFT - volume step previous
  - if:
      - condition: trigger
        id: Move_Right
      - condition: state
        entity_id: input_boolean.camera_fullscreen
        state: "on"
    then:
      - service: input_select.select_next
        data: {}
        target:
          entity_id: input_select.camera_volume_step
    alias: RIGHT - volume step next
  - if:
      - condition: trigger
        id: Move_Up
      - condition: state
        entity_id: input_boolean.camera_fullscreen
        state: "on"
    then:
      - service: input_number.set_value
        data_template:
          entity_id: input_number.camera_volume_tmp
          value: >-
            {{ (states.input_number.camera_volume_tmp.state | int ) +
            (states.input_select.camera_volume_step.state | int) }}
    alias: UP - volume up (when fullscreen)
  - if:
      - condition: trigger
        id: Move_Down
      - condition: state
        entity_id: input_boolean.camera_fullscreen
        state: "on"
    then:
      - service: input_number.set_value
        data_template:
          entity_id: input_number.camera_volume_tmp
          value: >-
            {{ (states.input_number.camera_volume_tmp.state | int ) -
            (states.input_select.camera_volume_step.state | int) }}
    alias: DOWN - volume down (when fullscreen)
mode: single
All this automation actually does, is simply updating some numeric helper values.
When in “free mode” (no video playing fullscreen), the left and right gesture, sets “counter.pagina” (page counter)
to a higher/lower value, resulting in the corresponding next or previous dashboard to show.
I have another automation, with a trigger when that counter.pagina changes,
it loads the corresponding page to the screen of the bathroom. Here is a snippet of this automation:
(DeviceID = the ID of the bathroom screen (used in Browser_mod), so that only this screen refreshes)
Helper automation to switch pages:
alias: HELPER - pagina_laad_URL
description: ""
trigger:
  - platform: state
    entity_id:
      - counter.pagina
condition: []
...
  - if:
      - condition: state
        entity_id: counter.pagina
        state: "9"
    then:
      - service: browser_mod.navigate
        data:
          path: /portrait-news
        target:
          device_id: f702e60ab257c2e45308dc8b452e56a3
  - if:
      - condition: state
        entity_id: counter.pagina
        state: "10"
    then:
      - service: browser_mod.navigate
        data:
          path: /portrait-video
        target:
          device_id: f702e60ab257c2e45308dc8b452e56a3
mode: single
Furthermore, when on the News dashboard, (this is known by looking at the counter.pagina helper),
another helper (counter.news) gets upped or downed, when gesturing up or down.
On that dashboard, I use a conditional card for every category, looking at the counter.news)
On the Video dashboard, a helper keeps track if a video is playing fullscreen or not, to control the volume.
A helper is set, to reflect the steps to increment/dectrement the volume, when making an up or down gesture.
Every time the volume is changed, a shell command is used, to adjust the volume on the RPI that runs the bathroom screen. This shell command is defined in the configuration.yaml and looks like this:
portrait_set_volume: 'ssh -i /config/ssh/id_rsa -o StrictHostKeyChecking=no user@bathroom_IP amixer -D pulse sset Master {{ states.input_number.camera_volume.state }}%'There are a few specific linux commands needed to perform certain tasks on the remote device. (RPI in my case), you can find more info about those shell commands in the topic Home Assistant – control “things” on a remote linux device