Most people know by now what ChatGPT is. If not, check it out at https://www.openai.com and https://chat.openai.com/
Most people use it to help them out with some HA automation.
I use it “IN” automations, to get data and represent it in HA dashboards and cards.
This article show you how you can get a list of the 30 most important historical events that happened in the last 750 years,
for the given current day/month combination.
1. Sign Up / Login to https://www.openai.com
You first need to login (or sign up, this is free !) on https://www.openai.com
If everything is OK, you should be redirected to https://beta.openai.com/overview ,
and on the top-right corner of your browser,you should see your “account”.
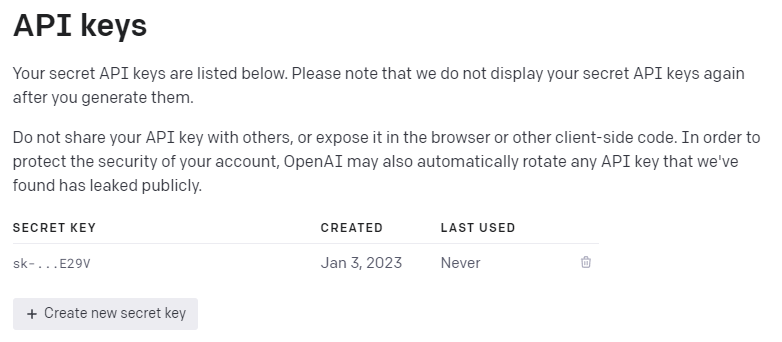
When clicking on this account, a popup-menu should appear, click “View API keys” in this menu.
Next, click on the “Create new secret key” button.
You will get a popup with a (long) API key, copy it, and save it, because you are not able to see this key again !
2. Create and test your OpenAI question
Note for windows users: Make sure Curl is installed ! It should be installed on newer windows versions,
in case you don’t have it, head over to https://curl.se/windows (On linux / MacOS, it is installed by default)
Also, you will need jq (for Windows / MacOS / Linux) , you can find it on https://stedolan.github.io/jq/download/
Try the following from a terminal / dos prompt:
curl -s "https://api.openai.com/v1/completions" -H "Content-Type: application/json" -H "Authorization:Bearer API_KEY" -d "{\"model\":\"text-davinci-003\",\"prompt\":\"count to 10. \",\"max_tokens\":4000,\"temperature\":0}" | jq -r ".choices[]".textIf everything works out find, you should see 1, 2, 3, 4, 5, 6, 7, 8, 9, 10 as an answer.
Let’s analyse this piece of code:
*replace API_KEY with the real API key that you retrieved in step 1.
*Model text-davinci-003 is the most advanced model for the moment.
(have a look at https://beta.openai.com/docs/models/overview for more models to use)
*”count to 10″ is the actual request. You can replace this with any question, even in your own language.
*0 in temperature, is the “risk” the AI may take, it’s a good idea to leave this at 0.
*| jq -r “.choices[]”.text filters out the real response from the received Json. (try it without the pipe and jq command)
3. Get your command in HA
normally, when you put >filename behind this line, the output will not be shown on your screen, but will be redirected into a file, called “filename” (Of course, you may change this filename)
Within HA, Curl will “block” this output, and even blocks the command after the pipe.
So, curl blabla” | jq -r “.choices[]”.text > output.txt will not work !
But there is a solution for this:
1. Use the -o filename option with curl, this will put the output in a file, called filename
2. Create a second command, that uses this file as an input, and do the jq magic.
Run the following command on your HA:
curl -s "https://api.openai.com/v1/completions" -H "Content-Type: application/json" -H "Authorization:Bearer API_KEY" -d "{\"model\":\"text-davinci-003\",\"prompt\":\"Give me a list with the 30 most important events from the last 750 years, that happend on January 13. Format this output as an rss feed and put only the year in the title..\",\"max_tokens\":3500,\"temperature\":0}" -o www/history_events_tmp.rssThis will create a “dirty” RSS feed, in /config/www/history_events_tmp.rss
*you don’t need to include the config-part of the file-location in the -o option.
*This file will be overwritten when it exists.
To make a “clean” RSS feed, you also need to run the following command on your HA:
more /config/www/history_events_tmp.rss | jq -r ".choices[]".text > /config/www/history_events.rssThis makes sure we will have a file history_events.rss in our /config/www/ folder, without the additional Json “garbage”.
4. Make those commands available in HA, as services
Next, you need to make an addition in configuration.yaml
shell_command:

    history_events_01: 'curl -s "https://api.openai.com/v1/completions" -H "Content-Type: application/json" -H "Authorization:Bearer API_KEY" -d "{\"model\":\"text-davinci-003\",\"prompt\":\"Give me a list with the 30 most important events from the last 750 years, that happend on {{ sensor.date_day_month }}. Format this output as an rss feed and put only the year in the title.\",\"max_tokens\":3500,\"temperature\":0}" -o www/history_events_tmp.rss'

    history_events_02: 'more /config/www/history_events_tmp.rss | jq -r ".choices[]".text > /config/www/history_events.rss'
Make sure this is all formatted correctly:
*history_event_01 and history_event_02 should each be on one line.
*history_event_01 and history_event_02 should be indented to the right (4 chars is the regular space),
compared to shell_command
* you should create a sensor in HA in your configuration.yaml, named date_day_month.
* Reboot HA after checking if your configuration.yaml is valid.
    date_day_month:
      value_template: >-
        {{ now().strftime('%d %B') }}
      friendly_name: "date_day_month"
5. Automate the data capture
If everything is OK, you should have 2 extra services in HA:
shell_command.history_events_01 and shell_command.history_events_02
I have an automation, that gets new data every day at 5 minutes past midnight:
alias: "@Automation - renew history events, 5 minutes after midnight"
description: ""
trigger:
  - platform: time
    at: "00:05:00"
condition: []
action:
  - service: shell_command.history_events_01
    data: {}
  - delay:
      hours: 0
      minutes: 2
      seconds: 0
      milliseconds: 0
  - service: shell_command.history_events_02
    data: {}
mode: single
6. Make data visible in HA
Now, only thing left to do, is show the data in HA 🙂
Make sure you have feedparser / custom-list-card / card-mod installed in HA.
Add the following part to your configuration.yaml , and reboot HA (again)
(replace YOUR_HA_IP, with your actual HA IP address)
sensor:
  - platform: feedparser
    name: history_events
    feed_url: "http://YOUR_HA_IP:8123/local/history_events.rss"
    scan_interval:
      hours: 1
We now have a feedparser named “history_events”, we just need to add it to a dashboard.
type: custom:list-card
theme: ios-dark-mode
title: null
entity: sensor.history_events
row_limit: 25
feed_attribute: entries
columns:
  - title: ''
    field: title
  - title: ''
    field: summary
styles:
  card:
    - border-radius: 10px
card_mod:
  style: |
    ha-card {
      color: #FFFFFF;
      line-height: 31px;
      background: url('/local/www/history.png');
      background-size: cover;
      #background-attachment: fixed;
      background-position: center;
      background-repeat: no-repeat;
      font-size: 20px;
      overflow: auto;
      height: 915px;
      width: 1895px;
      border: 0px solid rgb(255,255,255,0%);
      background-color: rgb(255,255,255,0%);
*Title contains the year of the event, description speaks for itself.
*Change height and width , according your preferences.
*Change background url, to a background picture of your preferences. (or delete that line)
*line-height is the spacing between lines.
*Change the rest of the the card-mod style, to suit your taste …
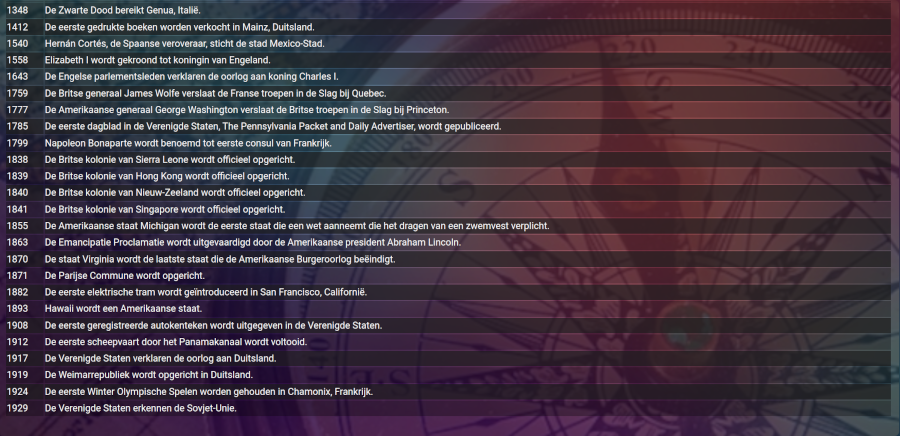
7. The final result !
This is how my “view” looks like and it automatically refreshes every day (after midnight)
to reflect the events that happend on the actual day, within 750 years in the past …