I’m still working from home … I made a switch from our local (Benelux) department, to the global (worldwide) IT department. (still within the same company, for more then 20 years …)
Because this switch requires lots and lots of teams-calls, I still work most of my time from home.
(otherwise, all this teleconferencing will interrupt my co-workers in the office, and they interrupt me.
(Noise is the keyword here)
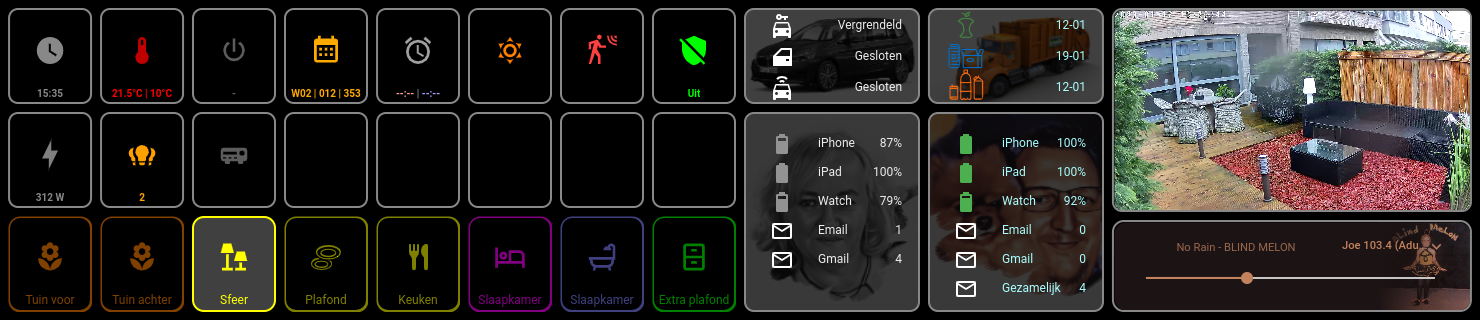
I always wanted a small, non intrusive screen, sitting on my desk, so I can see the most important HA aspects, just by looking at this small screen.
I still had a 1480×320 screen (29 cm x 7 cm) laying around, which does fit nicely under my 50″ computer-screen 🙂
You can order the screen directly from WaveShare:
https://www.waveshare.com/11.9inch-hdmi-lcd.htm
Also, have a look at the WaveShare Wiki for this screen:
https://www.waveshare.com/wiki/11.9inch_HDMI_LCD
They also have a screen with 1280×400 resolution:
https://www.waveshare.com/7.9inch-hdmi-lcd.htm
https://www.waveshare.com/wiki/7.9inch_HDMI_LCD
By using a baremetal OS installed on a RPI3, and using chromium as the only application running, I could give this RPI3 a nice “second live”, with enough “responsiveness” to run HA dashboards smoothly.
1. Install the “baremetal” OS
Baremetal is maybe a wrong word-choice, but installing only Chromium this way, gets rid of the burden of “other processes”, taking up to much precious processing-power.
*Browse to https://www.raspberrypi.com/software/ and download Raspberry Pi Imager , this download is available for Windows / MacOS / Linux
*Next, install this application, and start it.
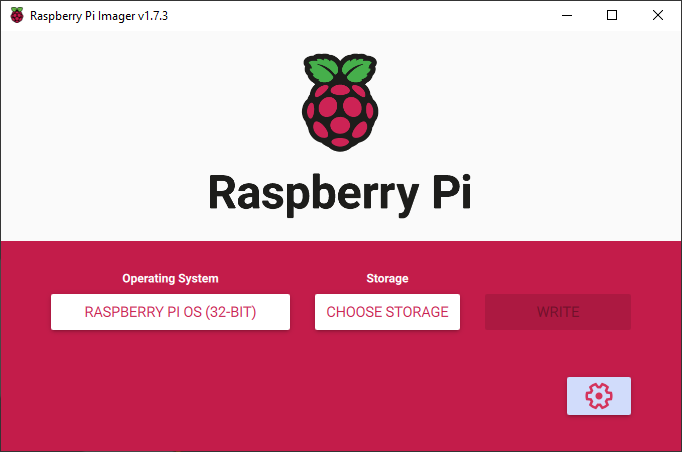
You have 4 buttons in this application:
1. Select “RASPBERRY PI OS LITE (32 bit)” as Operating System.
2. Insert an SD card into your PC (1 GB should be enough, but speed matters in this case, use at least a Class 10)
3. Next, click on the Gear-button (under the write button)
– Make sure “Enable SSH” and “Use password authentication” are selected.
– Check “Set username and password”, and type a Username & Password. (you need this later)
– If you want to use Wifi, Check “Configure wireless LAN”, and give the SSID & password for your WiFi.
– Check “Set locale settings”, and select your Time zone and Keyboard layout.
– Click “SAVE”
– Next, click “WRITE”, OS will be downloaded and written to your SD Card.
– When this is completely finished, put SD Card into RPI, and start the RPI.
– Get your RPI IP by checking your router of use a keyboard/screen, and use “ifconfig” from a command line.
2. Making modifications to use the 1480×320 or 1280×400 correctly
Put your SD card into your PC, and open config.txt in the root of the boot partition.
Put the following code at the bottom of the file, for the 1480×320 display:
max_framebuffer_height=1480
hdmi_group=2
hdmi_mode=87
hdmi_timings=320 0 80 16 32 1480 0 16 4 12 0 0 0 60 0 42000000 3
Put the following code at the bottom of the file, for the 1280×400 display:
hdmi_group=2
hdmi_mode=87
hdmi_timings=400 0 100 10 140 1280 10 20 20 2 0 0 0 60 0 43000000 3
3. Configure the installation: install additional parts
Next, login to your RPI via SSH (Or Putty, when using Windows, download it here: https://www.putty.org/ )
on Mac or Linux, open a terminal, and type ssh username@rpi_address
(replace username by the name you typed in step 1, and replace rpi_address by the ip address of your RPI.
Next, you will get a message about the RPI SSH fingerprint, accept this by typing Y
When asked for a password, type the password you did set in step 1.
Now, you are remotely logged into the RPI, everything you type now, actually is done on the RPI, until you disconnect.
So, type the following commands, to install some additional parts:
(those installations can take some time, depending on your internet connection speed)
sudo apt-get install --no-install-recommends xserver-xorg x11-xserver-utils xinit openbox
sudo apt-get install --no-install-recommends chromium-browser
4. Configure the installation: making changes to autostart chromium browser
Next, we are going to add some commands to the autostart.
Put it in edit mode:
sudo nano /etc/xdg/openbox/autostartAdd the following lines to this file: (close with <ctrl> and <x> and answer with Y)
xset -dpms
xset s noblank
xset s off
chromium-browser --noerrdialogs --disable-infobars --check-for-update-interval=31536-00 --kiosk http://IP_OF_HA:8123/PAGE_TO_LOAD/0
*The first 3 lines take care that screen-blanking is disabled and doesn’t get turned off.
*The 4th line, starts chromium, without any additional bars, no error dialogs and nog check for updates.
*Change IP_OF_HA to the IP address of your HA-instance
*Change PAGE_TO_LOAD to the name that appears when you open the preffered dashboard into HA.
If you need to rotate the display, you need to put the following code between the line with xset s off and the line containing the chromium command:
export DISPLAY=:0 ; xrandr --orientation left(replace “left” with “right”, if you need to rotate to the other side)
The “rotate” command for the config.txt , as explained in the WaveShare Wiki, does NOT work in this baremetal OS installation !
5. Configure the installation: final steps
We need to tell the RPI, to Start X, when booting up:
touch ~/.bash_profile
sudo nano ~/.bash_profile
And put the following text in this file:
[[ -z $DISPLAY && $XDG_VTNR -eq 1 ]] && startx -- -nocursorAnd to finish things, this is the last command to put on the command prompt 🙂
source ~/.bash_profileAfter this, you need to reboot the RPI. (sudo reboot will do the trick)
If all goed well, after seeing some startup-messages scrolling in the terminal, after which your selected HA-dashboard will be shown fullscreen on the display.
6. Configure the installation: how to hide the top-bar and side-bar
There is a good chance that you have a top-bar or side-bar in the view.
For this, there is also an easy fix.
*Open the dashboard, and click on the top-right corner on the 3 dots.
*Select “Configure UI”.
*Click again on the 3 dots on the top-right corner.
*Now select “Raw Configuration” editor.
*Add the following part on top of the yaml, save it, and reload the dashboard on the RPI.
(replace “username” with the default username for HA)
kiosk_mode:
  user_settings:
    - users:
        - username
      kiosk: true
      ignore_entity_settings: true
      hide_header: true
      hide_sidebar: true
      hide_menubutton: true
      hide_overflow: true
-=[ Q&A ]=-
How to take screenshots ?
Because this installation does not have a desktop running, this is a valid question 🙂
Via SSH, install scrot: sudo apt-get install scrot
After this, you have the ability to make screenshots:
export DISPLAY=:0 ; scrot /home/user/screenshot.png
(replace “user” with your username)
You will then find a png-file at the given location, containing a screenshot from the moment you executed this command.
Next, you can transfer the file to your computer, running this command on your computer:
scp user@RPI_IP:/home/user/screenshot.png /screenshot.png
(replace RPI_IP with the IP address of your RPI that is connected to the screen, and “user” with your username)
Next, you will have the screenshot transferred to the root of your computer 🙂
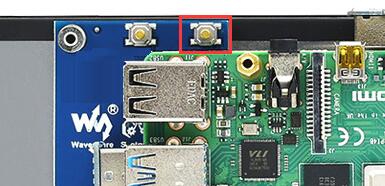
How come that my touch-screen not functions correctly ?
This problem mainly occurs when you use the screen in “rotated” mode.
You need to tell the screen, that it’s rotated 🙂
There are 2 buttons on the back of the screen. the left one, is to turn the screen on/off.
The other button (marked with a red square), needs to be hold down for at least 5 seconds.
(while everything is up-and-running) This will fix your problem …
Can I have your YAML file for your 1480×320 screen ?
Yes, you can 🙂
Download it here …
