In our new cabinet, we have about 3 large glass shelves, each 90 cm x 90 cm (35,43 inch x 35,43 inch), on each shelve we are going to put a diorama. The central theme of each diorama, will be “trains” … This tutorial is about the 3th diorama, named “The cargo dock”.
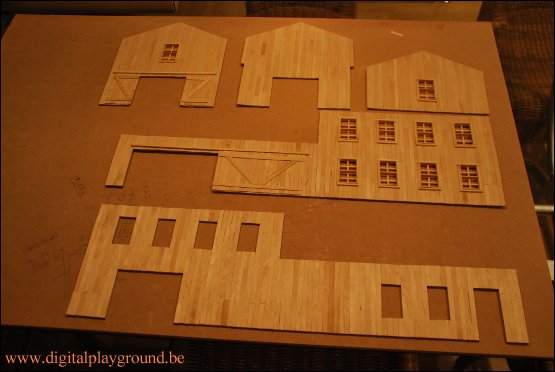
This diorama will be mainly build with “standard materials”. (foamboard, matches, wooden pieces, cork, and … glue 🙂 The idea of the 3th diorama, is to have a fully “cargo dock”, where loading of gondola’s is shown. This diorama will contain my WR360 locomotive, 2 gondola’s, an opel truck, a wooden warehouse, and lots of figures and cargo 🙂 I found the building instructions of the wooden faller warehouse. (faller item 120250)
Those building instructions are for a H0-scale (1/87), but with some calculations, I can convert it to 1/35th scale. The warehouse will measure approximately 75 centimeters in length. (29,5 inch), and will be build out of wooden koffie-spoons.
(those wooden sticks that measures about 5 mm (0,20 inch) in width and 14 centimeters (5,5 inch) in length,>br> which you get at coffeeshops and Dutch railwaystations)

I use the building instructions of this faller H0-kit for measuring purpose.

Back-view of that same faller H0-kit.
First results … (Monday – december, 20th – 2010)
It’s already a year ago, since I started this tutorial, but today I (proudly) present you the first “pieces” of this diorama 🙂 Because the WR360 (and a gondola) is already finished, we switched the order of diorama-building. As you may guess, this diorama will be finished first 🙂 All walls are done (except the windows in one wall). I only used the faller kit for measuring references, my own cargo dock looks a bit different 🙂
All walls …
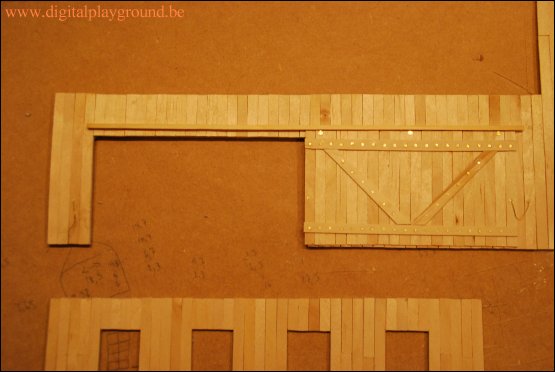
Detail of the large sliding door. Note the hinges and nuts/bols/chain !

Detail of the small (side) sliding door. This door opens in 2 pieces (left/right)
Because Christmas and New Year are comming close, I just tucked away all pieces. I will continue to work on this diorama at the beginning of january 2011 …
Some progress … (Friday – february, 4th – 2011)
Christel also decided to do some building on this diorama, to speed things up a bit 🙂 It’s almost a month-and-half ago, since the last update, but this was due to illness. (I was ill during the week between Christmas and New Year, and became ill again for 2 weeks during the month of january) So, here are some progress-pictures … In the meanwhile, all walls for the building itself, got finished (even the wooden base) It got it’s first “color”, but there is still a lot of painting/washing/weathering/coloring to be done !
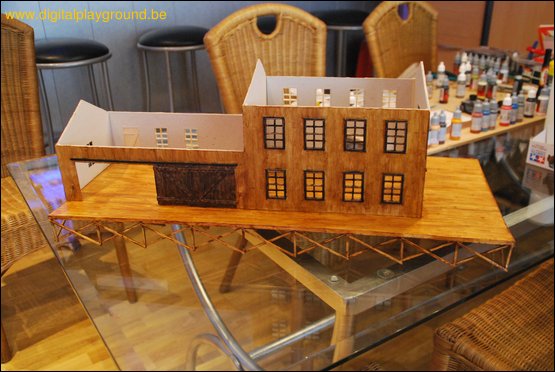
The side which lays next to the tracks

Sideview (notice the chaines, bolts, hinges etc …)

Frontview (colors/hinges/bolts still missing)
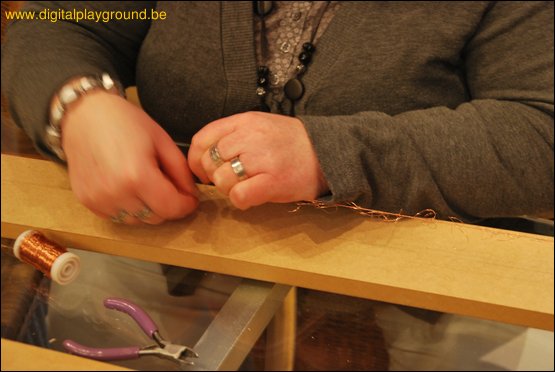
We needed a large tree for this diorama, so Christel did take jump, and created this beautiful tree 🙂 She started with a middle of a small round wooden piece, and she turned green iron wire(diameter 0,5 mm) around it, with a lot of “extended loops”, next she did cut those loops, and twisted and bended it, to form the branches. Next, we sprayed it with glue, and added some MDF saw-dust on it. When it dried, we added a brown color with our airbrush. After this, we sprayed it again with glue, and sprayed 2 different types of green flocks on it, together with some “green grass” mixture.

Global overview, this tree measures about 35 centimeters (13,8 inches) in height.

Detailed view on the leafs

Christel even created some nice roots 🙂
Next to this Cargo Dock, there will be a double railroad. Everybody surely remember my WR360 and Gondola, Those will be put on one side of the railroad, on the other side I will put a BR52. (build still in progress)

The WR360, already weathered completely and SMD LEDs build into it.

The first Gondola is also completely ready. (Second Gondola is build, but not yet weathered)
While Christel did some tree-building, I started with the rails. You get the wooden beams and rails separately, so I builded them together, and glued everything on a cardboard base. Next, I painted the wooden beams dark brown, and the clamps/nails which connects the rails to the wooden beams, in a rusty color. (And the rails where also painted rusty) After letting this dry for a night, I started putting small stones between the wooden beams 🙂

Me, painting the rails 🙂

This is how the left side of the diorama looks like for the moment, I still need to added the left railroad track.
Next to the Cargo Dock, there will be a small loading/unloading scene. A truck, placed in a small piece of dirt-road, and next to it, a crane, to load goods from the dock onto the truck.

The truck, with lots of PE-parts added to it ! (SMD LEDs not yet installed)

The crain, lots of pieces for such a small thing 🙂 I still need to add a concrete base underneath it and some stairs, so it will sitting at the same height as the loading platform of the cargo dock.

This is how the middle-front of the diorama looks like for the moment.
At the right side of the diorama, there will be a road, with 2 vehicles on it. Next to this road, we will add a field for a couple of cows, our tree, and a few cut-off tree-pieces.

The tree trunks, already painted and weathered.

Our 2 cows: it did take a few days to assemble/paint them. (They come in to many parts !)

A barrel, water-fountain and drinking piece for our cows 🙂

Vehicle number 1: A Citroen car.(SMD LEDs not yet installed)

This was an English supply-car, which I modified to be German.(SMD LEDs not yet installed)

Global overview of the right side of the diorama
Christel created barb-wire, to put behind the fields with the cows in it 🙂

Global overview of the whole diorama, a lot of work still needs to be done !
The complete building will also be decorated and illuminated at the inside ! I already started building/painting the furniture for the office at the first floor.

2 closets at the right (including vases and books) and a clock at the left. I’m still waiting for a finger-clock to arrive (from China), which I will take apart, and use the mechanism to make this standing clock, a real working clock 🙂

The desk with chair and bin. Notice the small phone 🙂 I still need to add an SMD LED to the desklight.

The table with four chairs (also for the office)
Next, I did put all furniture like inside a rectangle, with the measurements of the original building, to see how everythings fit in it. If you look carefull, you will also see a fireplace on those pictures … More about this fireplace, just underneath the next 2 pictures 🙂

Left side of this picture, points to the front of the diorama.

So, if you look inside the building from the front of the diorama, you will have a clear look
onto the desk and the fireplace.
I still had a small 240×320 pixels colorscreen laying around from the Australian company “4D Systems”. The screen even have a Picaso MD2 module attached to it. If you use “Graphic Composer” from 4D Systems, you can even create a slide-show on a micro SD card, which will be played onto the screen, when you power it up. Next, I looked on youtube for a fireplace video, This is what I use as a base:
It’s actually a widescreen video (landscape), but it’s the ideal video to take a “portrait”-piece out of it, Without loosing any of the fire details 🙂 Next, I edited it with Kdenlive in Ubuntu, and converted it with Lives into an array of images. After this, I imported the images with 240×320 pixels resolution into Graphic Composer, and added a 42 milliseconds delay between every frame. This gives a smooth 24 frames/second progressive “slideshow”. I converted the files to DAT and GCI files, and did put them onto a 2 GB micro SD card. The result looks good 🙂

On the left, this small LCD screen (2.8 inches) and the modified/painted fireplace on the right … The fireplace is actually a model from “Verlinden Productions” in the USA, I did cut out the backplate of it, with a Dremel. (LOL, everything comes in lots of pieces, except this firewall)

This is how it looks like, put together. (I still need to add some wooden bricks/blocks into the fireplace)
Still to do:
- building electricity poles. (and creating light fixtures for them)
- Creating a wooden frame behind the diorama, with EL wire in it.
- Finishing the second railroad track.
- Build a concrete base for the crane.
- Building a cobblestone road, and a small dirt-road.
- Making some sunflowers, to put next to the road, in a field next to the field of the cows.
- Creating the fields 🙂
- Disassembling the ring-watch (when it arrives) and put the mechanism onto the standing clock.
- Create some electronics for it (for the lighting, and to let the steamtrain make nice/real steam every hour)
- Put some publicity, the company-name onto the front/side-wall of the building.
- put SMD LEDs into the vehicles/bureau lighting fixture.
- put LEDs into the ceilings.
- Create tiles for the roof of the building, and put them onto the building.
- Building some man/figures
- Put earth/turf/grass etc … onto the diorama, to make it look more “natural”.
- Painting/coloring/washing/weathering everything.
- Probably still a lot of things I forgot/not on my list …
Still working hard … (Wednesday – february, 9th – 2011)
The past weekend and the past evenings, I have been working hard on the diorama 🙂
– I builded and painted 5 figures (still 5 to go), and placed them on the diorama.
– Also, painting the crates and pallets is mostly done.

Frontview.

Sideview.
The electricity poles are also ready. I did cut a “line” into the poles from top to bottom, to hide the electricity wires in (for the LEDs). After this, I filled up the “line” with putty, and polished and painted the poles. Then I drilled a hole trough the top of the pole, and placed a warm-white LED in it (with a painted IR reflector). One wire is connected at the front, and painted black, so it looks like the light is connected to the black electricity box. The other wire is hidden at the back, and painted brown.

3 poles with light, and one small pole without light.

Detail of one side of the top of a pole.

Detail of the other side of the top of the same pole.
Next, I started with the “block” that will sit beneath the crane. I created the 4 walls for this “block”, with stones, cut out of cork 🙂

The 4 walls.
Another small update … (Friday – february, 11th – 2011)
Today, I filled up the wall with plaster, and builded the underpiece of the crane-platform together. Next, I created the platform, and added a railing to the crane platform, and to one side of the small stairs. I used coper-wire for this, which I soldered together, and painted it black 🙂

Overview.
Cobblestone road (Friday – february, 18th – 2011)
Today, I created about 4320 cobblestones 🙂 I created a tool to “stamp” multiple cobblestones at onces, instead of carving them one by one. I bought an aluminium plate, 0,5MM thick, and cut off a strip of 2 CM. Next, I carved lines in it, 2 lines, separated 0,5 CM apart, and next a “space” of 1,5 CM. After this, I turned the strip around, and did do the same thing on the other side. except, I carved lines at the places where I did leave out 1,5 CM of space on the other side. After this, I bended the strip at those lines, at 90 degrees angles.(with the carved lines at the outside of the angles) Next, you have a “stamp”-tool 🙂 (for clarity, look at the following pictures …)

The aluminium plate.

One part of the alu strip carved in.

The alu strip, bended to create cobblestones.

The fresh clay, inside the road-template.

The first results.
To be continued …