Now that I’m finally able to take descent screenshots, It’s time to dive into the current status of this project.
A lot of things have changed since the beginning of this project, so the “good quality” screenshots,
do also contain some new/different things, in comparison to the “old” screenshots … Lets dive in to it, right away 🙂
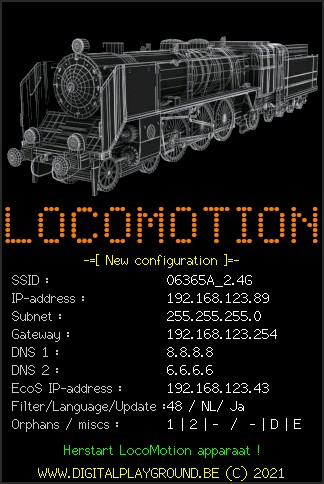
When you startup the LocoMotion device, you get the following screen.
Some checks are performed on this screen, before activating the real software.
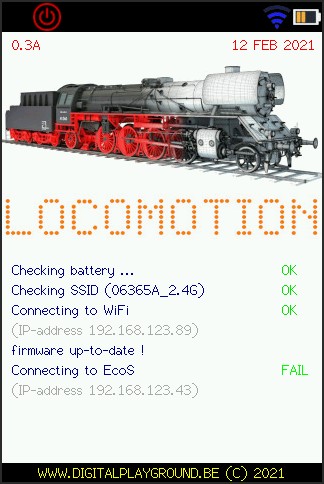
- Battery is getting checked
- Check if defined WiFi network is reachable
- Connect to the WiFi (with defined IP configuration or DHCP)
- Online check for new firmware (if defined in configuration)
- Check connection with EcoS device, get all locomotives and switch-info
and check application/firmware/hardware version of EcoS
All these checks together, take only a few seconds.
In case “automatic update” is set, it takes 3 seconds longer.
(if update needs to be performed, it only take a bit more than a minute)
The meaning of the icons in the top-bar of the screen, from left to right, are:
- Star = connection with EcoS OK
- Power icon = green when EcoS in “GO” mode / red when EcoS in “Stop” mode
- Blue icon = strength of WiFi-signal
- completely to the right = power-indicator of battery
During this startup procedure, you see onder this top-bar, the current firmware-version (left) and the current firmware-date (right)
You will notice that after a manual or automatic update, this info changes.
When the automatic update is activated (see further under “captive portal” on how to (de-)activate this option), a check is performed on our website, to see if your version/date corresponds to the version/date of the firmware on our website. If needed, the new firmware is automatically downloaded and installed. LocoMotion will reboot after this update procedure.
Your settings will remain the same.
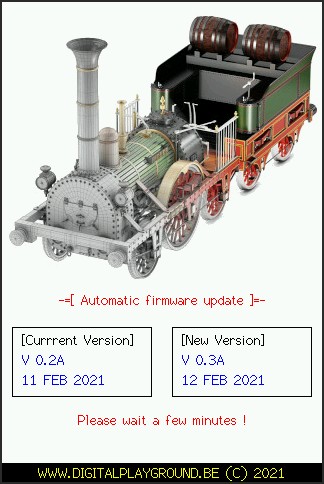
When automatic update is disabled, or the LocoMotion controller can’t connect to the internet, this step is skipped.
There is a way of course, to do a manual update.(via your WiFi) To activate this function, you need to press the hidden
“firmware update” button, during startup.
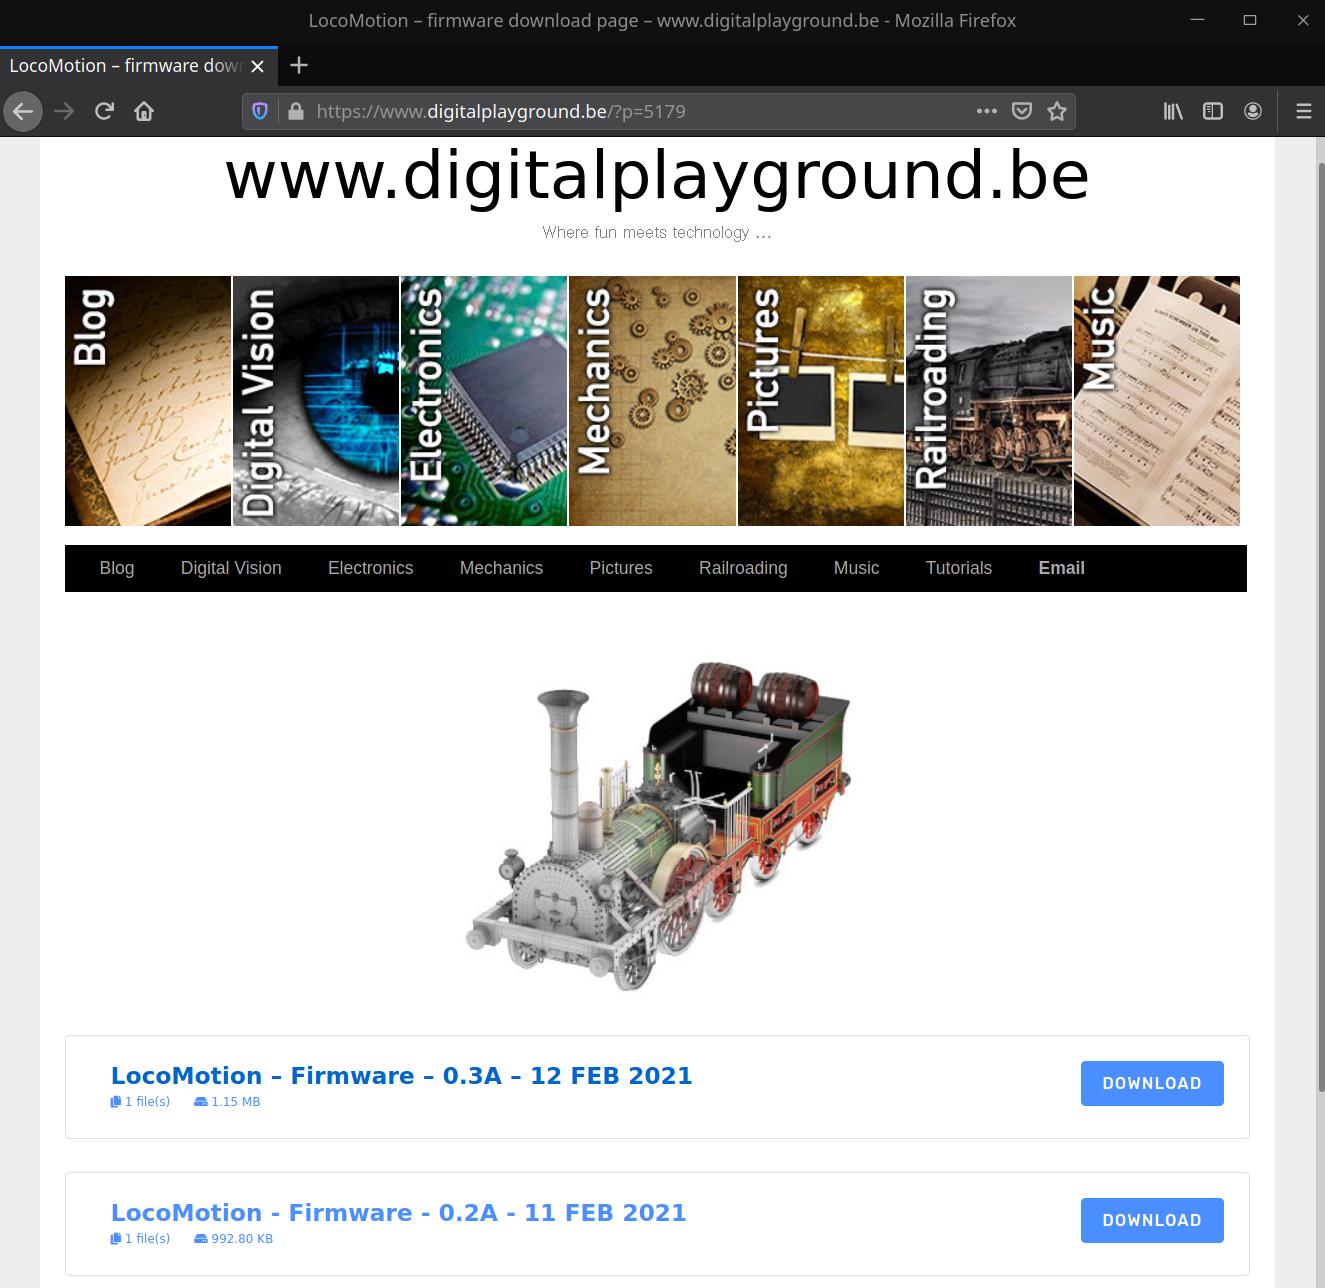
All firmwares (old and new) can be downloaded from our website at https://www.digitalplayground.be/locomotion.html
At startup in Manual update mode, the device registers itself on your WiFi network, as a regular device,
via configured IP-settings or DHCP.
On the TFT screen, a message appears on how to connect to the device, to proceed with a manual update.
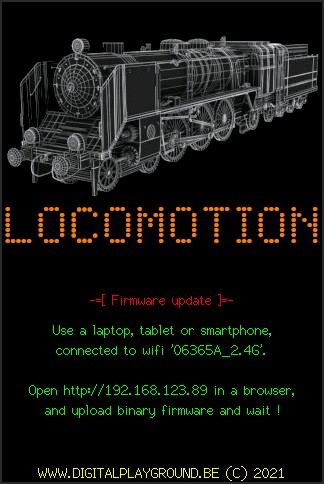
When you openup a browser with the given URL, you get a screen to select a bin-file. (that you downloaded from our website)
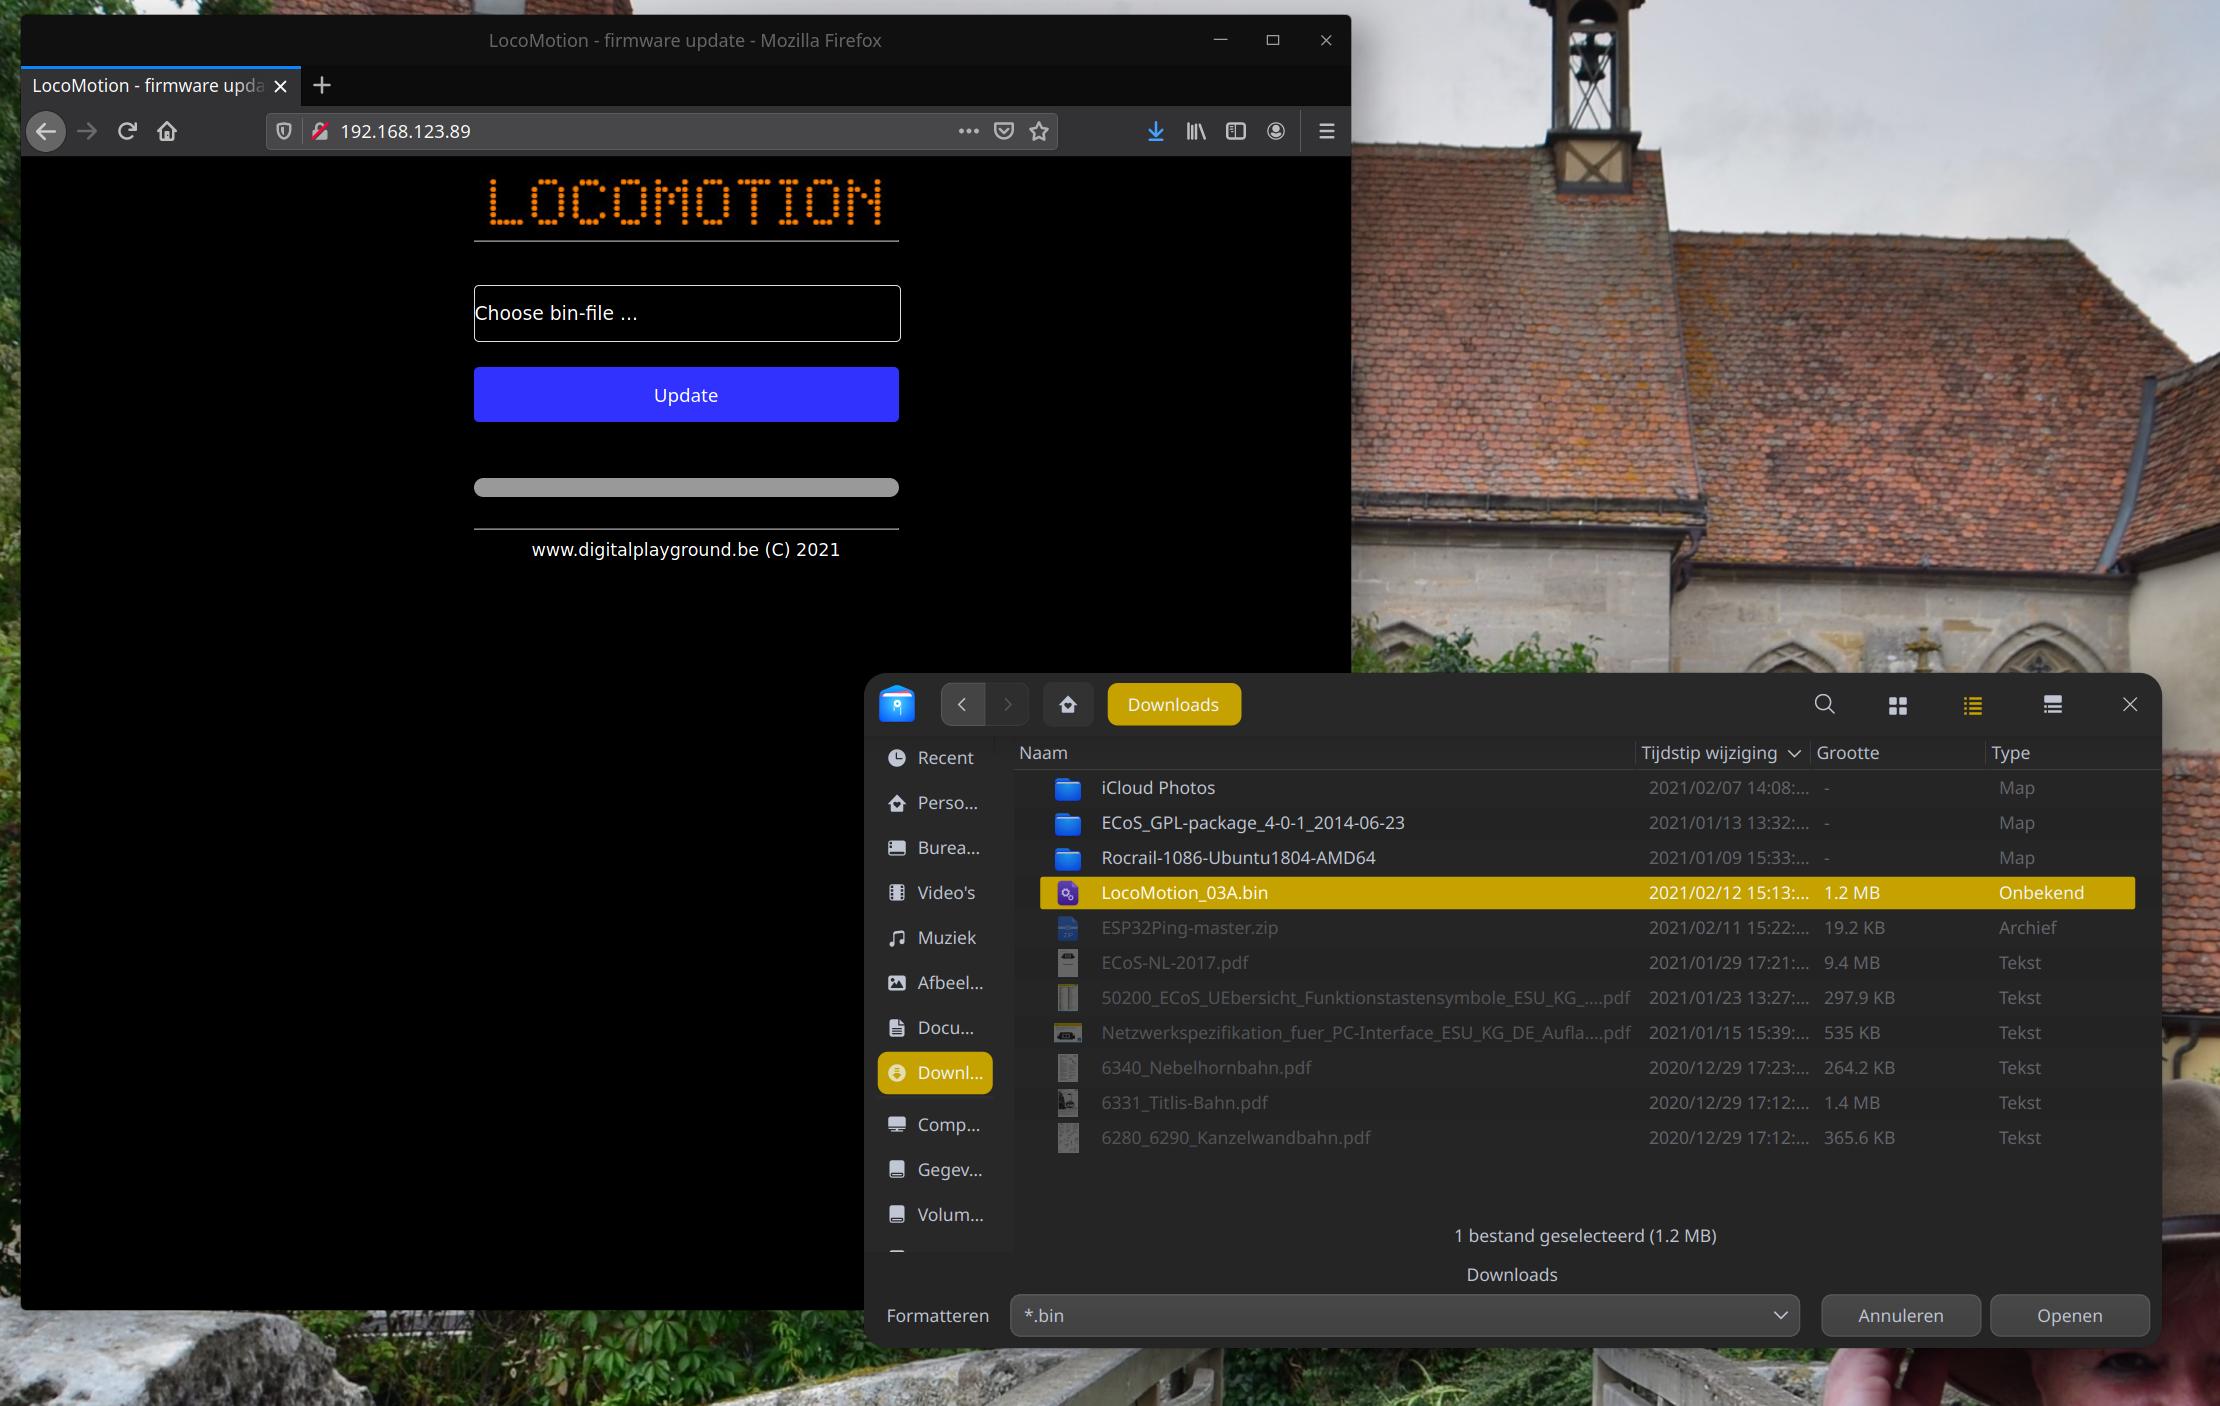
Top-left is the selection screen, within the browser. Bottom-right you get the selection-screen, to select the file.
(this is a regular file-open dialogbox on all operating systems, my selection-screen looks a bit unusual for most of you,
because I use Deepin 2.0 Linux)
After selecting the bin-file, and pushing the “update” button, the update-procedure begins …
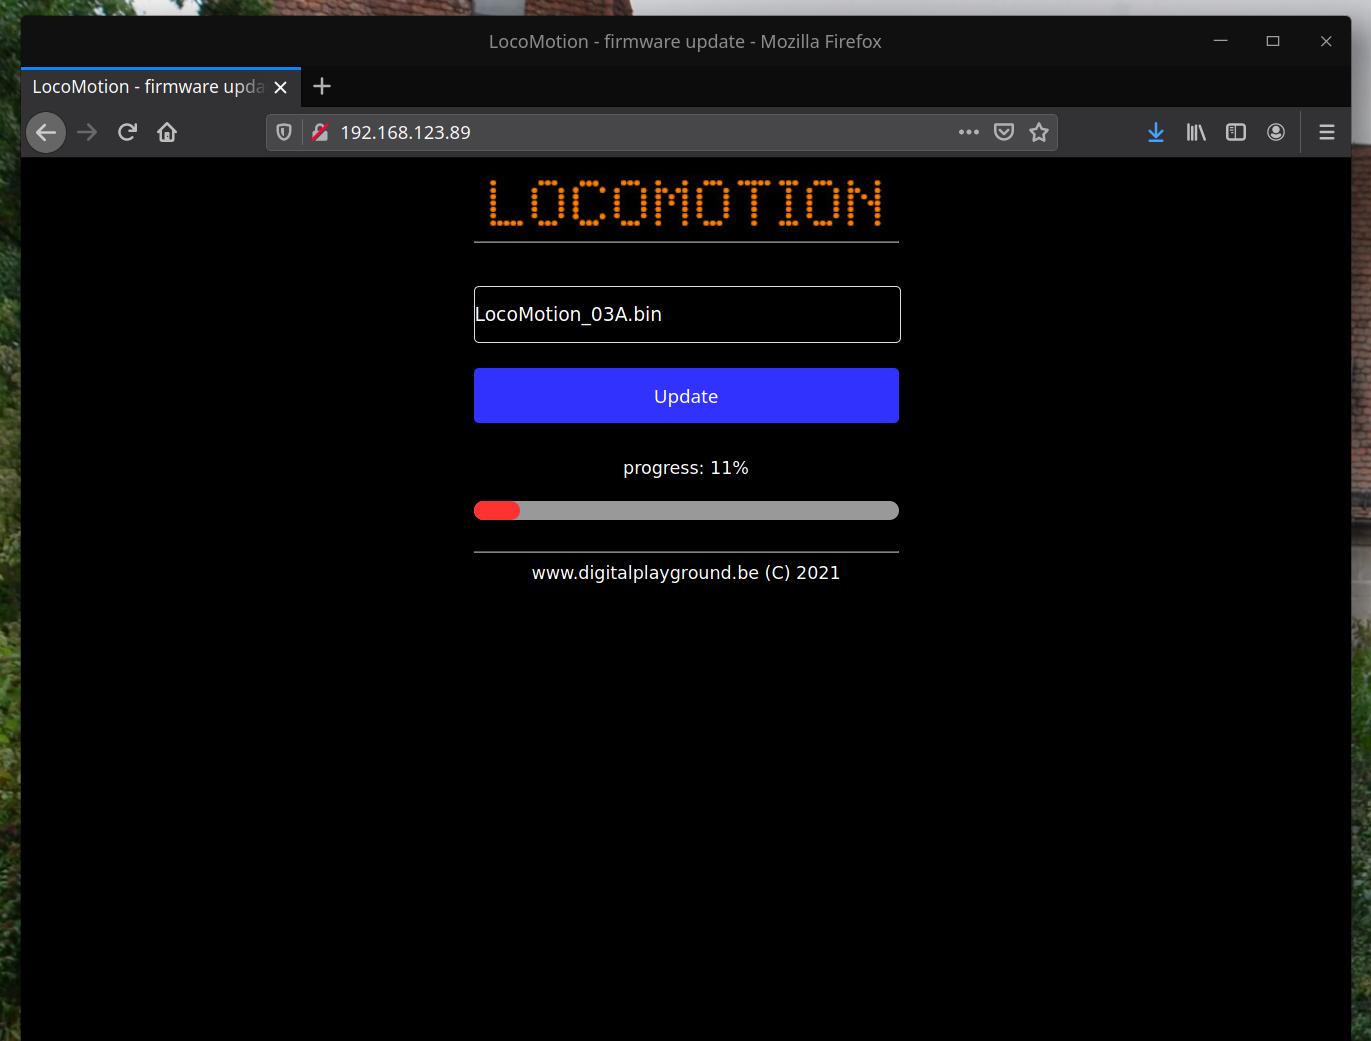
You can follow the progress of the update (takes less than a minute),
and after the update the LocoMotion device is automatically rebooted.
Just a remark in between:
You see on (most) screenshots, English text. The language of the LocoMotion device is configurable !
(There is currently a dictionary installed with 4 languages: English/Dutch/German/French)
The screens in the browser, are all English of course.
So, after all this, we go back to the begin-screen, where we left … When there goes something wrong during startup (wrong WiFi / wrong IP configuration / No connection with EcoS …), the device will turn into “Captive portal” mode. This is a special mode, that brings up a configuration-screen of the device, onto your laptop/PC/tablet/smartphone. It’s easy to access, and you get a message
on the TFT-screen …
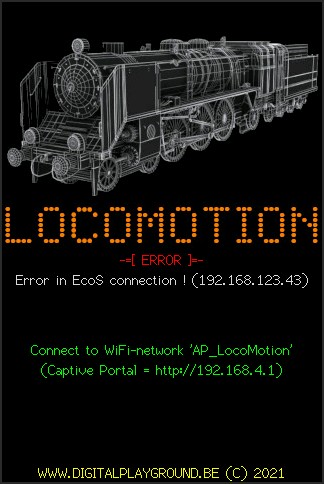
The only thing you need to do, is look for a WiFi network “AP_LocoMotion”, and connect with it ! (no password needed)
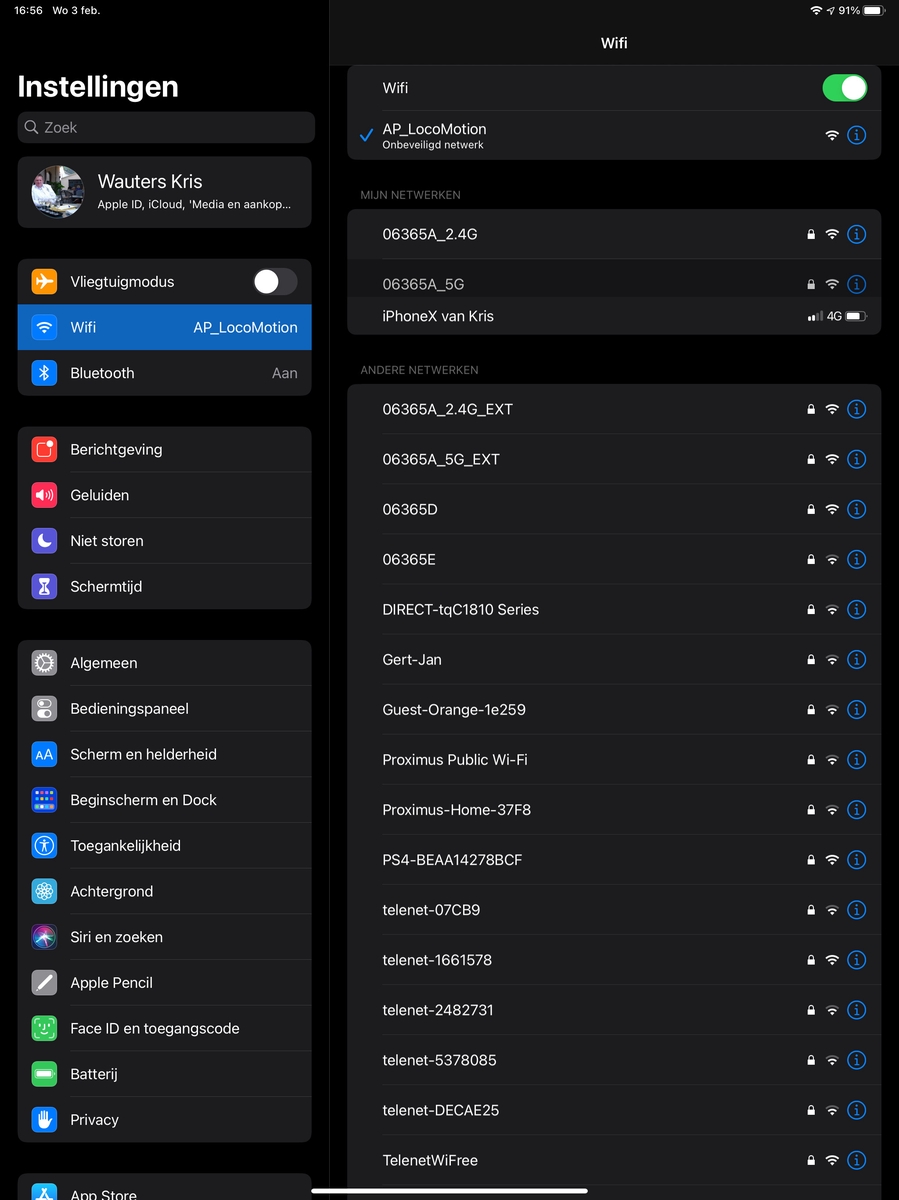
Next, you will get on you tablet (or the device that you use …), automatic the Captive portal.
If this is not the case, open-up a browser, and type in the URL that is displayed on the TFT screen. (mostly http://192.168.4.1)
Whenever you feel that you need to change certain settings, there is another way to open-up this Captive portal. There is a hidden “captive portal” button that needs to be pressed, when you turn on the LocoMotion device. This will also bring up this Captive portal.

On top, you see all WiFi networks that the LocoMotion device is able to find (Yellow list). It’s enough to click on your preferred one, to bring the name into the “SSID” field. Next you also need in your WiFi password. Underneath it, you can enter your IP/Subnet/Gateway/Dns1/Dns2. If you are not familiar with all these terms, and you have a working WiFi network at your place, you probably use DHCP. (you can fill in 0.0.0.0 in all 5 fields.
Except the IP-address of the EcoS, that needs to be filled in correctly. I advise you to look in the EcoS manual, for more information.
Next is the “steps for filter – multiple of 6”. This is for people with lots of locomotives, so you can make “big jumps” in the locomotive list. Because the regular filter-view shows 6 locos at a time, this number needs to be a multiple of 6.
(All fields are checked before you can save them, also IP-addresses etc …, you will get a warning
whenever there is an invalid value somewhere)
Next, you can point out in what favorite-list orphan locomotives needs to show up. EcoS contains a mistake. You can add/edit locomotives, and save them back without assigning them to at least one favorite list. In EcoS they will not be shown anymore.
The only way to reach them, is by typing in the address. (And this is something we don’t want / can’t remember)
The same goes for “miscellaneous” locomotives. You only have Steam/Diesel/Electric locomotive lists in EcoS, no miscellaneous.
With these checkmarks, you can set in what category those locomotives needs to show up.
Next, you have room for 12 panel descriptions. These panels are for switches … You can place up-to 12 switches on one panel.
(more about this, under “switches”.)
Next, you can choose the language you want LocoMotion to run in. (Currently 4 languages: English/Dutch/German/French)
And finally, a checkbox to turn automatic updates on/off …
Of course, you need to press “save” to store your new/changed settings. When this is done, you get a summary of the new settings. This stays on the TFT until you reboot. (the “Refresh” button is to re-scan for WiFi networks)
Finally, we passed all checks, and configuration/update screens !
Time for the real work !
We start with the “last” screen (from the 6 interface parts), this is the “General information” screen.
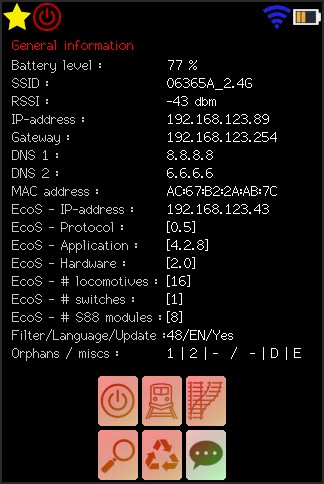
This screen shows an overview of all settings. (Always handy for support)
At the bottom, in the middle, you see 6 icons. These are always the same 6 icons, they form the “main menu”.
– first row, left: power button, this brings the EcoS into Stop/Go mode
– first row, middle: locomotives button, to choose/control locomotives
– first row, right: switches button: to choose a panel and control switches
– bottom row, left: S88, live preview of all defined/connected S88 modules
– bottom row, middle: syncronize locomotives
– bottom row, right: General Information (as explained above)
An active icon is lighter, an in-active icon is darker !
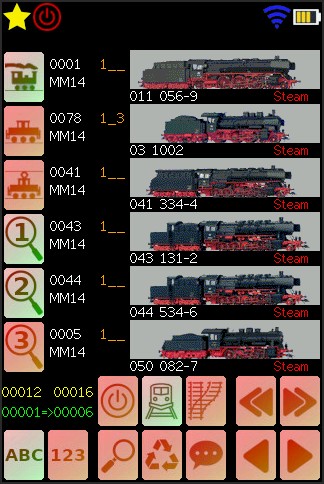
This is the locomotive-filter.
On the left-side, you can “set” what you want to see in the result-list.
– First 3 icons indicate what type of locomotives you want to see in the result.
– Underneath, you can choose what favorite-lists the results needs to be picked from. (1, 2 or 3)
– Finally, bottom-left, you indicate the type of sorting (ABC=alphabetically / 123=On address)
On this screenshot, you see that only “steam-locomotives” are active, and that the locomotives needs to be in favorite-list 1 or 2.
This is a big plus, compared to EcoS II, where you can only choose 1 type of locomotive and 1 favorite list, while with LocoMotion,
you can form any combination you like. We also like numbers, while with EcoS you can only “guess”. Bottom-left in yellow,
you see that there is a total of 16 locomotives defined, and that only 12 meets our criteria. Under this, in green,
you see that we are currenly watching locomotive 1 till 6 on screen.
On the bottom-right, you have icons to move forward/backward (6 each step) in the list.
Just above this, you have the step-forward/step-backward. (As defined in the Captive portal, to take “big” steps)
For every 6 locomotives, you see:
- the picture
- underneath it, the name (and on the right, the type of locomotive (steam/diesel/electric)
- Left of this, in white, the loc-address and protocol
- Finally, in orange,, on what favorite list(s) the loco is put.
(all 6 are on list 1 in this picture, except the second, that is on list 1 & 3)
By clicking on a locomotive, this becomes the selected locomotive, so you can control it.
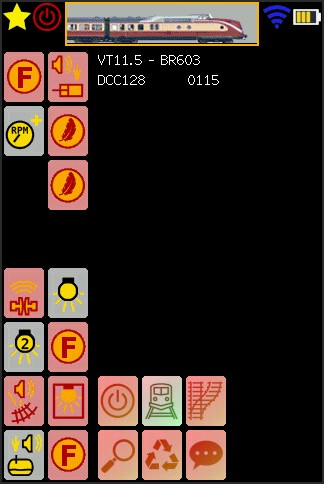
- To the left and right, you will find all locomotive functions. The loc in the image only has about 16 functions, but we do support up to 32 functions.
- Light icons are activated functions, dark icons are not activated
- Icons correspond with definitions in the EcoS / MFX / Lokpilot / LokSound (Like they also do in CS & MS)
- On top, of course the image of the loc, with name/protocol/address underneath it
The only thing missing, is the speed-control, but there is enough room left in the middle.
(I’m still waiting for some rotary encoders to be delivered from China) …
The next screen, switches, is still under heavy development.
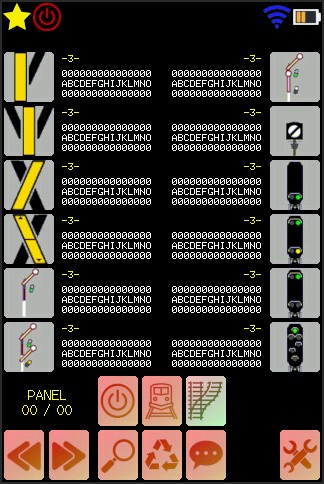
The main goal consists about the fact that you can build “panels”. 12 switches on each panel. (6 on every side of the screen)
To edit this panels, you need to push the icon on the bottom-right.
With the bottons on the bottom-left, you can move forward/backward between panels. The name of the panel will be where the word “PANEL” is, on the bottom-left. The icons are a 1-on-1 match with what is defined in EcoS. Also switches with 2/3/4 “states”,
like foreseen in the EcoS, are possible.
Next in line, is the S88 live preview.
The number of modules and type of modules (8 or 16 sensors) are retrieved from the EcoS.
At the bottom-right, you see the total number of modules, on the left you see that we are currently viewing module 1 till 5.
(And module 3 is an 8-sensor module, while the other 4, are all 16-sensor modules)
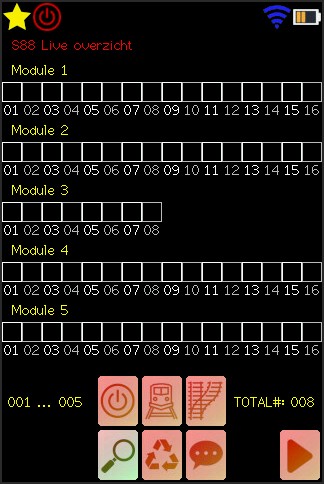
As soon as one or multiple sensors are “occupied”, the corresponding box will be colored orange. This is completely live.
At the bottom-right, you have forward/backward buttons, to move trough all modules. (the backward button is not shown here,
because we are at the beginning of hte Module-array)
Finally, the second last in the list. (because we already introduced the “last” one) Getting the loco-images !
At first sight, this seems not be doable, at least, Esu did not succeed it with the Mobile Controller II. With that device, you need to enter all your loco-images separately, and link them again. (Talking about double, work, and the chance you make a mistake,
is equally growing with the number of locomotives you own)
Adding images to the EcoS, is done via a web-browser. And you can’t “pick up” these images again from the EcoS (without a browser. That functionality simply isn’t there. Another “hurdle” is the fact that every time you do request an image via the browser, the internal name changes ! These names are also only available for a short period of time …
But, with some clever coding, I managed to retrieve all loco-images, both the system-images and the user-images.
This is a process that takes up to 2 minutes, but only needs to be performed when you did make changes to
the loco-images via the browser-functionality from the EcoS.
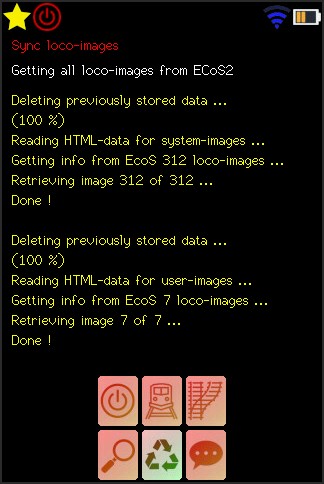
This clever coding, makes that you don’t need to do any manual action to link you loco-images inside LocoMotion. It simply works ! 1-0 for me 🙂
So, as of today, what is still on the todo-list ?
- Finish the train control (implementing speed/forward/backward) But I still have to wait for the rotary encoders to show up …
- Finish switches: create/control panels
- Think about an alternative for the locomotive filter (certainly for people with lots and lots of locomotives, as I do …)
- French dictionary (no coding, only take care of translations in the dictionary-file)
- Starting with designing a 3D enclosure in Solidworks (not only do I need the rotary encoder to show up for this,
but also the joystick modules needs to be here !) - Because I switched to OTA, I only have half the program-memory left for my program (this is normal), I don’t know if this is going to be enough …
So check-out the Lolin D32 Pro (which comes with 16 MB Flash)
I need to modify the boards.txt and add a custom partition scheme. - wire everything (TFT/I2C/rotary/joystick/battery etc …) to this new module, and see that all I/O pins correspond to code. (or change code if needed)
TO BE CONTINUED …